
Until you save a document to a disk (either hard or floppy), that document exists only in your
computer’s memory. When saving a new document, you must name the file and also specify
you want it to be saved. Word 2003 can store files using any number of formats. The
most common are the .doc and .htm formats. The .doc format is the proprietary document
format used by Word, and .htm is the universal format used for Web documents.
You can edit an existing Word file and create different versions in different formats by saving
the file in a particular format—the original file will be untouched, so you’ll end up with two
separate files. This capability enables you to exchange files with others who are using different
word processors or HTML authoring programs.
To save a document, follow these steps:
1. Click the Save button, or choose File➪Save (Ctrl+S). The Save As dialog box appears
. By default, the File Name text box lists the first sentence of the document
in the text box.
2. Enter a name with as many characters as you want, within reason. The entire pathname,
including all the directories and the file name, cannot exceed 255 characters.
For ease of use and efficiency, however, keep your file names as concise as possible.
A Word document file name can include letters, numbers, and spaces, as well as the following
symbols: @ # $ % & ( ) [ ] _ { }. Word automatically adds the file name extension
.doc for you, so you don’t have to type it.
3. Click OK or press Enter to save your document. If you try to save a document with the
name of a previously existing file, Word displays a dialog box asking you to confirm that
you want to replace the existing document. Click No to type a different name for the
document being saved, or click Yes to replace (or overwrite) the existing document.
The next time you save your document, you won’t have to type a name, of course. Pressing
Ctrl+S will quickly save the file.
Saturday, August 22, 2009
Helping WordPerfect users
If you are a WordPerfect user and new to both Word and Windows, choose Help➪WordPerfect
Help to display the Help for WordPerfect Users dialog box.In the Command
Keys list, select a function or WordPerfect command to display to the right of the list information
about how to carry out that function in Word. If there is an ellipsis after the selected item,
double-click the item or choose Help Text to display a submenu of related items (unfortunately
there’s no way to go back without closing the dialog box and starting again!). If an arrow is next
to the item, you can click the Demo button and have Word demonstrate that feature, though
you should read the text first because it’s not always apparent what is going on. If you click
Demo when you have not selected an item with a Demo attached, the dialog box simply closes
The Help Text button closes the dialog box and opens a message box carrying the help text
for the item you selected. This box stays visible while you are working in the document, so
you can follow the instructions as you work; if there’s a Demo associated with the Help item,
you’ll see a Demo button in this message box.
Using the Microsoft Word Help task pane
If you would rather use the Windows-style Help system instead of the Office Assistant, you can
turn off the Office Assistant, as previously mentioned. The Windows-style Help system uses a
Web-like interface. You can click on hyperlinks to go to related help topics. After you turn off
the Office Assistant, you can access the Microsoft Word Help task pane by
choosing Help➪Microsoft Word Help or pressing F1.
The Microsoft Word Help task pane includes three areas:
✦ The Search area, where you type a search phrase and press Enter or click the Table of
Contents link to open, yes, the Help Table of Contents
✦ The Office on Microsoft.com area, with links to Microsoft’s Help Web site
✦ The See Also area, with a few additional links to more information
Browsing the Help Contents
The Table of Contents link displays a Table of Contents for Help topics. The
book icons that appear in the Contents tab are referred to as chapters. Click a book to show
all the Help pages in that topic. Click an entry with a ? icon to open a Help window displaying
information about that subject.
Searching for Help
Type a search term into the Search box at the top of the task pane, and then click the green
arrow or press Enter. You’ll see the results. Click on one to open a window containing text
about that topic . Or you can click the category below an entry to display the
Table of Contents, already open to that category, where you can browse similar subjects.
Accessing Microsoft Office Help on the Web
Word includes an option to connect automatically to an entire menu of online Help sites by
clicking Help on the menu bar and then scrolling down to Office on the Web. This way, you
have access to the entire wealth of the Internet in getting assistance with Word 2003 and with
your document itself. Click Microsoft on the Web, and select an option from the submenu.
These options connect you with a particular Internet site. You can load these sites through
any Internet browser, such as Microsoft Internet Explorer or Netscape Navigator
Saving a document as a Web page
Word 2003 provides a seamless interface for creating both Word (*.doc) and Web (*.htm) documents.
Because the HTML (HyperText Markup Language) format is a native file format, you
can save any .doc file as an .htm file, and vice versa. Word saves the .doc formatting as well
as the .htm formatting. This allows you to create Web documents in Word for viewing in a
Web browser. Word also reads those documents back in for editing, however. When any Word
document is saved as a Web page, almost all the document’s information, including its content,
formatting, and document properties, are retained in the HTML document.
Saving a document as a Web page is easy. Choose File➪Save as Web Page, which displays the
Save As dialog box with the .htm file name extension already selected. You can save the document
by clicking Save. Clicking Change allows you to change the page title for the document,
which appears on the title bar of the Web browser window. You also can save a Word document
as a Web page from the Save As dialog box, just as you would any other file format—
select the format from the Save As Type drop-down menu.
Using the Office Assistant
By default, the Office Assistant is always on the screen. Click the icon to receive help on any
subject, and a box appears that prompts you for a search phrase. Press Enter, and the Help
task pane opens with the search results. Right-click the Office Assistant to display a pop-up
menu of Office Assistant options. Choosing Hide hides the assistant, but only during the current
session. The next time you open Word, the assistant will be back (although if you keep
hiding it, eventually it will ask if you want to hide it for good).
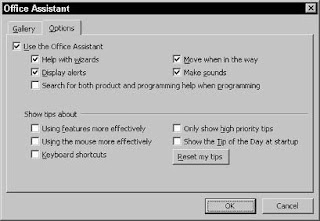
If the Office Assistant is not your preferred way to get help—quite frankly, it can be very
irritating—you can deactivate it. Right-click the icon and choose Options to display the
Office Assistant dialog box , which allows you to alter the situations in
which Office Assistant offers help. Clear the Use the Office Assistant check box to permanently
hide it. (Even with the Office Assistant shut off, you can display it anytime by choosing Help➪
Show the Office Assistant.) In the Gallery tab, you can select a different assistant. You also
can access the Gallery tab by choosing the Choose Assistant item in the pop-up menu.
The Office Assistant really isn’t very necessary because you can reach the Help task pane any
time by pressing F1.
subject, and a box appears that prompts you for a search phrase. Press Enter, and the Help
task pane opens with the search results. Right-click the Office Assistant to display a pop-up
menu of Office Assistant options. Choosing Hide hides the assistant, but only during the current
session. The next time you open Word, the assistant will be back (although if you keep
hiding it, eventually it will ask if you want to hide it for good).
If the Office Assistant is not your preferred way to get help—quite frankly, it can be very
irritating—you can deactivate it. Right-click the icon and choose Options to display the
Office Assistant dialog box , which allows you to alter the situations in
which Office Assistant offers help. Clear the Use the Office Assistant check box to permanently
hide it. (Even with the Office Assistant shut off, you can display it anytime by choosing Help➪
Show the Office Assistant.) In the Gallery tab, you can select a different assistant. You also
can access the Gallery tab by choosing the Choose Assistant item in the pop-up menu.

The Office Assistant really isn’t very necessary because you can reach the Help task pane any
time by pressing F1.
Getting Help in Word
Word offers several types of help, as well as different help interfaces. Here’s what you’ll find
on the Help menu:
✦ Microsoft Word Help: Opens the Help task pane, where you can type keywords to
find information, view a table of contents, and find information on the Microsoft.com
Web site.
✦ Show/Hide the Office Assistant: Turns the Office Assistant on and off. You can click
once on the Assistant to ask a question, or right-click to view a menu from which you
can set options. The Office Assistant incorporates IntelliSense Technology to provide
a natural language interface to the system. The Assistant also automatically provides
Help topics and tips on tasks that you perform as you work.
✦ Office on Microsoft.com: Loads the Office Web site into your Web browser. This is a
site that provides updated help information and other technical resources. You also
can download free service release updates and product enhancements, and purchase
third-party add-on tools that let you print postage, translate documents, send faxes,
and more.
✦ Contact Us: Displays the Contact Us page on the Office Web site.
✦ WordPerfect Help: This eases the transition for users switching from WordPerfect to
Word. There is a separate Help dialog box for WordPerfect users, and you can even turn
on an option that automatically tells you how to use a Word feature when you press a
WordPerfect keystroke combination.
✦ Detect and Repair: Runs a utility that checks the Microsoft Office program files for
problems and repairs any problems it finds.
✦ Activate Product: Turns on, or registers, the program.
✦ Privacy Settings: Allows you to modify your Customer Service Improvement Program.
This is a system by which Word can transmit information, across the Internet, about
your hardware and about how you use your computer. This is anonymous information
that Microsoft is using to plan new software and determine problems with Word. It also
allows Microsoft to upload new help information to your system, and a little program
that tracks software errors. By default this system is turned on; you can turn it off if
you prefer, as many users do. How do you decide? It all depends how paranoid (or careful)
you want to be. Do you trust that your information will be used appropriately? If
not, turn it off.
✦ About Microsoft Word: Displays a dialog box that includes information about Word’s
version number, the product’s license, and the system information about your computer
and Windows settings. You will most likely need this information when you call
for technical support. If a Word feature doesn’t seem to be working, click the Disabled
Items button in this dialog box. Word sometimes disables components that are causing
problems (restarting the program may restart the functions).
In addition, you’ll find a Type a Question for Help text box on the right side of the menu bar;
type keywords in here, press Enter, and the Help task pane opens
Thursday, August 20, 2009
Drag-and-drop editing
Drag-and-drop editing with the mouse is an easy way to move or copy a selection. This feature
is especially convenient for copying or moving text a short distance or between two documents
that appear on the screen simultaneously. Drag-and-drop editing also allows you to
scroll through a document to copy or move text and graphics over long distances, such as
numerous pages. To scroll through a document when performing a drag-and-drop operation,
drag the selected item beneath the horizontal ruler or above the horizontal scroll bar.
A quick way to gather several pieces of text and graphics for pasting is to use a second
document window. Or, you can drag and drop selections onto the desktop to create scrap
documents. To open and work with a new document window, choose File➪New and then
Window➪Arrange All. Use drag-and-drop editing to move or copy text and graphics between
the document windows.
To move or copy text and graphics between windows using drag-and-drop editing, follow
these steps:
1. Select the text or graphics that you want to move.
2. Do one of the following:
• To move a selection, point to the selection and hold down the mouse button until
you see the drag-and-drop pointer.
• To copy a selection, hold down the Ctrl key, point to the selection, and then hold
down the mouse button until you see the drag-and-drop pointer.
3. Drag the pointer to the new location. Note that the object is inserted at the location of
the insertion point, not at the pointer.
4. Release the mouse button to drop the text into place.
Wednesday, August 19, 2009
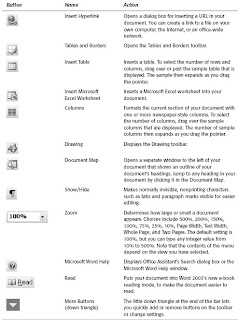
The Formatting toolbar
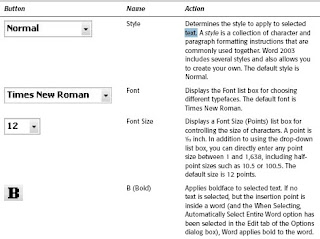
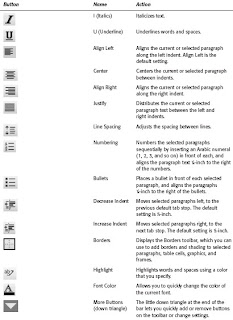
The Formatting toolbar displays controls that affect the appearance of characters and paragraphs
in your document. As you move the insertion point through the document text, the
Formatting toolbar reflects the formatting applied to that text. Figure 1-5 shows the buttons
on the Formatting toolbar, and Table describes what these buttons do.


in your document. As you move the insertion point through the document text, the
Formatting toolbar reflects the formatting applied to that text. Figure 1-5 shows the buttons
on the Formatting toolbar, and Table describes what these buttons do.


The Standard Toolbar
The Standard toolbar includes both frequently and infrequently used commands for working
in Word 2003. Figure shows the buttons on the Standard toolbar, and Table describes
what these buttons do.

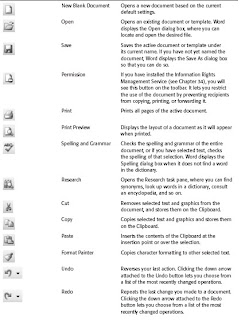
in Word 2003. Figure shows the buttons on the Standard toolbar, and Table describes
what these buttons do.


Monday, August 17, 2009
Touring the Word Environment
The Word environment includes the elements that make up your interface with it, and
the main components of the Word screen. The title bar at the top of the
screen displays the program name (Microsoft Word). The Document1 file name is the default
file name assigned to a new document. The Word Control menu is represented by the letter W,
located in the upper-left corner of the title bar. The Control menu provides the menu of commands
for manipulating the Word program window.
A window displayed in full-screen size is called a maximized window. The three buttons in the
top-right corner of the window minimize, maximize or restore, or exit your document, respectively.
(The middle button is the Restore button when the window is maximized, and it is the
Maximize button when the window is not full size.) The Restore button returns the window to
the size and position it had before it was maximize.
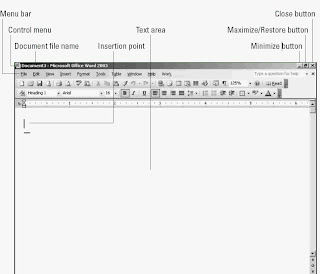
The text area
The text area of the window occupies the bulk of the screen; it is where you create, edit,
format, and view your document files. The blinking vertical bar is called the insertion point.
It indicates where text is to be entered into a document. You also use the insertion point to
specify the point from which you want to select or edit text. In a window’s text area, the
mouse pointer appears in the shape of an I-beam.
The menu bar
Directly below the title bar is the menu bar, which contains pull-down menus that organize families
of commands for working with documents. Word 2003’s menus arrange together commands
that perform similar actions. For example, the File menu contains a group of commands that
manipulate your document files. Choosing a command tells Word what to do; for example, the
File menu contains commands to open, print, and save your documents.
You can open menus by clicking them or by pressing Alt+underlined letter shown in the
menu’s name on the menu bar. Pressing Alt+A, for example, opens the Table menu. It’s important
to note that when you open a menu, it doesn’t display all the menu options, so when we
talk about menu options in this book and you can’t find them, make sure you open up the
menu completely. You can do this by clicking the little arrow buttons at the bottom of the
menu. (You can change this behavior by choosing Tools➪Customize, clicking the Options
tab, and selecting Always Show Full Menus.)
Toolbars
Word comes with a number of toolbars, each of which contains a series of buttons designed
to perform common related tasks. To display a list of available toolbars, choose View➪
Toolbars; a submenu of toolbars appears. Currently displayed toolbars have a checkmark
next to them. An even quicker way to choose a toolbar is to display a pop-up toolbar menu by
clicking the right mouse button anywhere on a toolbar.
Moving your mouse pointer over a toolbar button displays the name of the button, which
often gives you a clue regarding its function. This pop-up button name is called a ScreenTip.
You can customize a toolbar by adding commands to it or by replacing the commands on the
toolbar with those of your own choosing. You can create a customized toolbar for each type
of document that you regularly produce. For example, you can create a toolbar with buttons
to access a regularly used command, such as creating a Search and Replace button to replace
the frequently used chart or columns buttons.
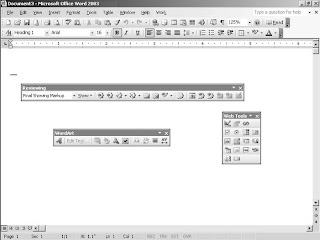
Word automatically displays the Reviewing toolbar. If you are working on a picture or drawing,
Word may display the Picture or Drawing toolbar.
The Standard and Formatting toolbars are normally anchored just below the menu bar. When
you display other toolbars, however, they either appear stacked in the order that you display
them or float on-screen like small windows. Some, like the Drawing toolbar, anchor themselves
to the bottom of the screen (above the status line).
To move a toolbar, simply use the drag bar to drag the toolbar to where you want it to be
displayed. The drag bar is indicated by four little dots on the left side of the toolbar or in the
top-left corner (depending on where the toolbar happens to be). Point at this bar, press and
hold down the mouse button, and drag the bar to the position you prefer. You can place a
toolbar on any window edge—top or bottom, left or right—or let it float inside the window.
You can also change a floating toolbar to an anchored toolbar by double-clicking the drag bar.
Figure 1-3 displays several toolbars, both anchored and floating.
the main components of the Word screen. The title bar at the top of the
screen displays the program name (Microsoft Word). The Document1 file name is the default
file name assigned to a new document. The Word Control menu is represented by the letter W,
located in the upper-left corner of the title bar. The Control menu provides the menu of commands
for manipulating the Word program window.
A window displayed in full-screen size is called a maximized window. The three buttons in the
top-right corner of the window minimize, maximize or restore, or exit your document, respectively.
(The middle button is the Restore button when the window is maximized, and it is the
Maximize button when the window is not full size.) The Restore button returns the window to
the size and position it had before it was maximize.

The text area
The text area of the window occupies the bulk of the screen; it is where you create, edit,
format, and view your document files. The blinking vertical bar is called the insertion point.
It indicates where text is to be entered into a document. You also use the insertion point to
specify the point from which you want to select or edit text. In a window’s text area, the
mouse pointer appears in the shape of an I-beam.
The menu bar
Directly below the title bar is the menu bar, which contains pull-down menus that organize families
of commands for working with documents. Word 2003’s menus arrange together commands
that perform similar actions. For example, the File menu contains a group of commands that
manipulate your document files. Choosing a command tells Word what to do; for example, the
File menu contains commands to open, print, and save your documents.
You can open menus by clicking them or by pressing Alt+underlined letter shown in the
menu’s name on the menu bar. Pressing Alt+A, for example, opens the Table menu. It’s important
to note that when you open a menu, it doesn’t display all the menu options, so when we
talk about menu options in this book and you can’t find them, make sure you open up the
menu completely. You can do this by clicking the little arrow buttons at the bottom of the
menu. (You can change this behavior by choosing Tools➪Customize, clicking the Options
tab, and selecting Always Show Full Menus.)
Toolbars
Word comes with a number of toolbars, each of which contains a series of buttons designed
to perform common related tasks. To display a list of available toolbars, choose View➪
Toolbars; a submenu of toolbars appears. Currently displayed toolbars have a checkmark
next to them. An even quicker way to choose a toolbar is to display a pop-up toolbar menu by
clicking the right mouse button anywhere on a toolbar.
Moving your mouse pointer over a toolbar button displays the name of the button, which
often gives you a clue regarding its function. This pop-up button name is called a ScreenTip.
You can customize a toolbar by adding commands to it or by replacing the commands on the
toolbar with those of your own choosing. You can create a customized toolbar for each type
of document that you regularly produce. For example, you can create a toolbar with buttons
to access a regularly used command, such as creating a Search and Replace button to replace
the frequently used chart or columns buttons.
Word automatically displays the Reviewing toolbar. If you are working on a picture or drawing,
Word may display the Picture or Drawing toolbar.
The Standard and Formatting toolbars are normally anchored just below the menu bar. When
you display other toolbars, however, they either appear stacked in the order that you display
them or float on-screen like small windows. Some, like the Drawing toolbar, anchor themselves
to the bottom of the screen (above the status line).
To move a toolbar, simply use the drag bar to drag the toolbar to where you want it to be
displayed. The drag bar is indicated by four little dots on the left side of the toolbar or in the
top-left corner (depending on where the toolbar happens to be). Point at this bar, press and
hold down the mouse button, and drag the bar to the position you prefer. You can place a
toolbar on any window edge—top or bottom, left or right—or let it float inside the window.
You can also change a floating toolbar to an anchored toolbar by double-clicking the drag bar.
Figure 1-3 displays several toolbars, both anchored and floating.

Opening the last document
You can get Word to automatically open the last document you were working on by using the
/mfile1 switch.
You might create an icon that you use only when you want to open the last file. Note also that
you can open any of the last nine files in this manner. Typing /mfile3, for example, opens the
third from the last file you worked on.
/mfile1 switch.
You might create an icon that you use only when you want to open the last file. Note also that
you can open any of the last nine files in this manner. Typing /mfile3, for example, opens the
third from the last file you worked on.
Controlling Word Using Startup Switches
Using a startup switch lets you control how Word starts. A switch is a command-line parameter
that is added after the Winword program. To add a switch, follow these steps:
1. Right-click a Word shortcut to display the pop-up menu and choose Properties. The
property sheet for the shortcut is displayed.
2. Add the switch to the end of the Target settings command line.
For example, you can modify the command line to include the /n switch by typing
"C:\Program Files\Microsoft Office\Winword" "/n". (The /n switch instructs Word to
start without a default document.) Typically, Word starts with a blank document named
Document1, but you can start Word without loading that default blank document. Using this
startup option displays Word faster than the startup option of loading it with a document.
Opening Documents Automatically With Word
By creating a new shortcut, you can open a specified document at the same time you open
Word 2003 itself:
1. Right-click the Windows desktop and choose New➪Shortcut.
2. In the Create Shortcut box, click the Browse button and use the Browse for Folder dialog
box to find the winword.exe file (probably in the C:\Program Files\Microsoft Office
2003\Office 2003\ folder).
3. Add a document path and file name—enclosed in quotation marks—after the text that
appears in the Type the Location of the Item text box in the Create Shortcut text box.
Adding a document file name after the program name in the text box causes that document to
load automatically whenever the shortcut is used. To start Word and open a document named
Letter.doc stored in a folder named Docs on the C: drive, for example, add "C:\Docs\Letter.doc"
in the Target text box.
You can also modify a shortcut to start Word and load multiple documents by separating the
path names with a space. To load two documents named Letter.doc and Resume.doc in the
Docs folder, for example, type "C:\Docs\Letter.doc" "C:\Docs\Resume.doc".
The shortcuts created during Word’s installation cannot be edited. However, after you create
a shortcut, as described in the preceding steps, you can edit it as described in the following
section.
Opening a Document from Word
After you create and save a document, the file exists on your disk. To use Word to make
changes to the file or to save a copy of it under a different name, you need to open that file.
Word provides several methods for opening files. The easiest is to click the Open button on
the Standard toolbar. Another is to choose File➪Open or press Ctrl+O. Both methods take
you to the Open dialog box, where you can locate the file that you want
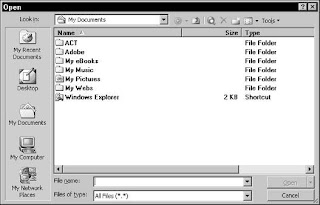
With the Views button (the little icon second from the right) on the Open dialog box toolbar,
you can change the display of your files. Click the drop-down arrow on the right side of the
button and play with the various views offered:
✦ Large Icons: Displays each file as a large icon with its name underneath. Quite frankly,
this is a very inconvenient way to display files and makes it difficult to find things. We
suggest you use a different view.
✦ Small Icons: Much the same as the prior choice but with smaller icons.
✦ List: An alphabetical list of files, which is much easier to work with.
✦ Details: A list showing each file’s size and date of last modification.
✦ Properties: Select a file in this view, and a pane on the right displays the file’s
properties.
✦ Preview: Select a file, and you can actually read the contents of the file in the right
pane.
✦ Thumbnails: Each file is displayed as a picture. This view doesn’t work with Word
document files unless the document author specifically saved a thumbnail image.
The Thumbnail view does work with image files and Web pages, however.
If a document is selected, the Views button on the Open dialog box toolbar also displays
details of the selected document and a window that allows you to see, as well as read, the
document.
If you worked on a document recently, that document is listed at the bottom of the File menu.
In this case, you only need to click its name to open it from the File menu. The default number
of files listed is four, but Word 2003 can list as many as nine file names at the bottom of the
File menu. You can choose how many files last opened to display by first choosing Tools➪
Options and then clicking the General tab. The Entries box across from the Recently Used File
List option displays the number of recently used file names currently displayed in the File
menu. To display the last seven files, for example, type 7 in the Entries box.
Starting Word with Windows
If you want Word to run whenever you start Windows, add the Winword program file to the
Startup folder in the Start menu. To add Word to the Startup folder using Windows, follow
these steps:
1. Open the Windows Start menu.
2. Click the Programs submenu, and find the Word menu option.
3. Point at the menu option in the Programs menu.
4. Press and hold down the mouse button while you drag the icon off the menu and place
it over the Startup menu—don’t release it yet.
5. Press the Alt key, and you’ll see a little curved-arrow icon—the shortcut icon.
6. Release the mouse button, and a shortcut icon is placed in the Startup menu.
7. Release the Alt key.
WHAT IS MICROSOFT WORD?
Microsft Word or MS Word is a word processing package program.Microsoft Corporation released this software worldwide. Microsoft Word or MS Word not only used for word processing but also used for various reasons such as compose, drawing, creating data etc.
Today learning microsoft word is necessary for all kind of people because without the knowledge of microsoft word none can perform his/her office work properly.
Today learning microsoft word is necessary for all kind of people because without the knowledge of microsoft word none can perform his/her office work properly.
Subscribe to:
Posts (Atom)
